For the birds

First, I am sorry about the lack of material for the past month. Between Rosh HaShannah and Simchas Torah, it is really hard to get any serious shop time. Then we have had house guests for more than a week after Simchas Torah was over. To further decrease my shop time, I have been running and working out to improve my health and control my weight. I have gone from 190+ pounds and a 38″ waist to 155 pounds and a 34″ waist, and I have more weight to lose. An hour of excercise a day really adds up in hours away from the shop. I hope to be finished up with the exercise and diet by the end of January and look forward to working on all the ideas I have cooked up, and I hope that a commission or two will come in.

So what have I done lately? I’ll tell you. The wife and I have always enjoyed looking at birds, so the day after Yom Kippur we became official Birders (yes, Bird Watchers). If we weren’t odd enough, now we are big time into birding. Therefore, since I have no commission work right now, I have been making bird feeders and bird houses. I had enough scraps to make a platform feed, a fruit feeder, a suet feeder, and a bluebird house. Think I might make another platform feeder or bird house if I get bored enough. Although they are simple projects, they are fun to make, and at least I was doing something in the shop.

Here is a photo of me and my work. I have attempted to see the birds more closely by mounting the bird house to my head whilst standing next to a tree. No luck yet, but I have seen this in a cartoon so I know it will work.

My new system for seeing birds close up

If you are wondering how we got into this Birding bit, it was because we saw the movie, The Big Year. We liked it so much that we have seen it three times in less than a month. And yesterday, we say an HBO documentary called; Birders, the Central Park Effect. I stupidly thought that Birding would be an easy, no money involved hobby. I could not have been more wrong! Binoculars, field guides, membership to the Baltimore Birding Club, and now we both have the hots to get a good digital camera, but that’s not going to happen unless we win the lottery! Why can’t I pick easy, no cost hobbies like tic tac toe, business card collecting or masturbation? (oh yea, that is not allowed). No matter what I do, it is always “Full Steam Ahead”! Ah the joys of being me.

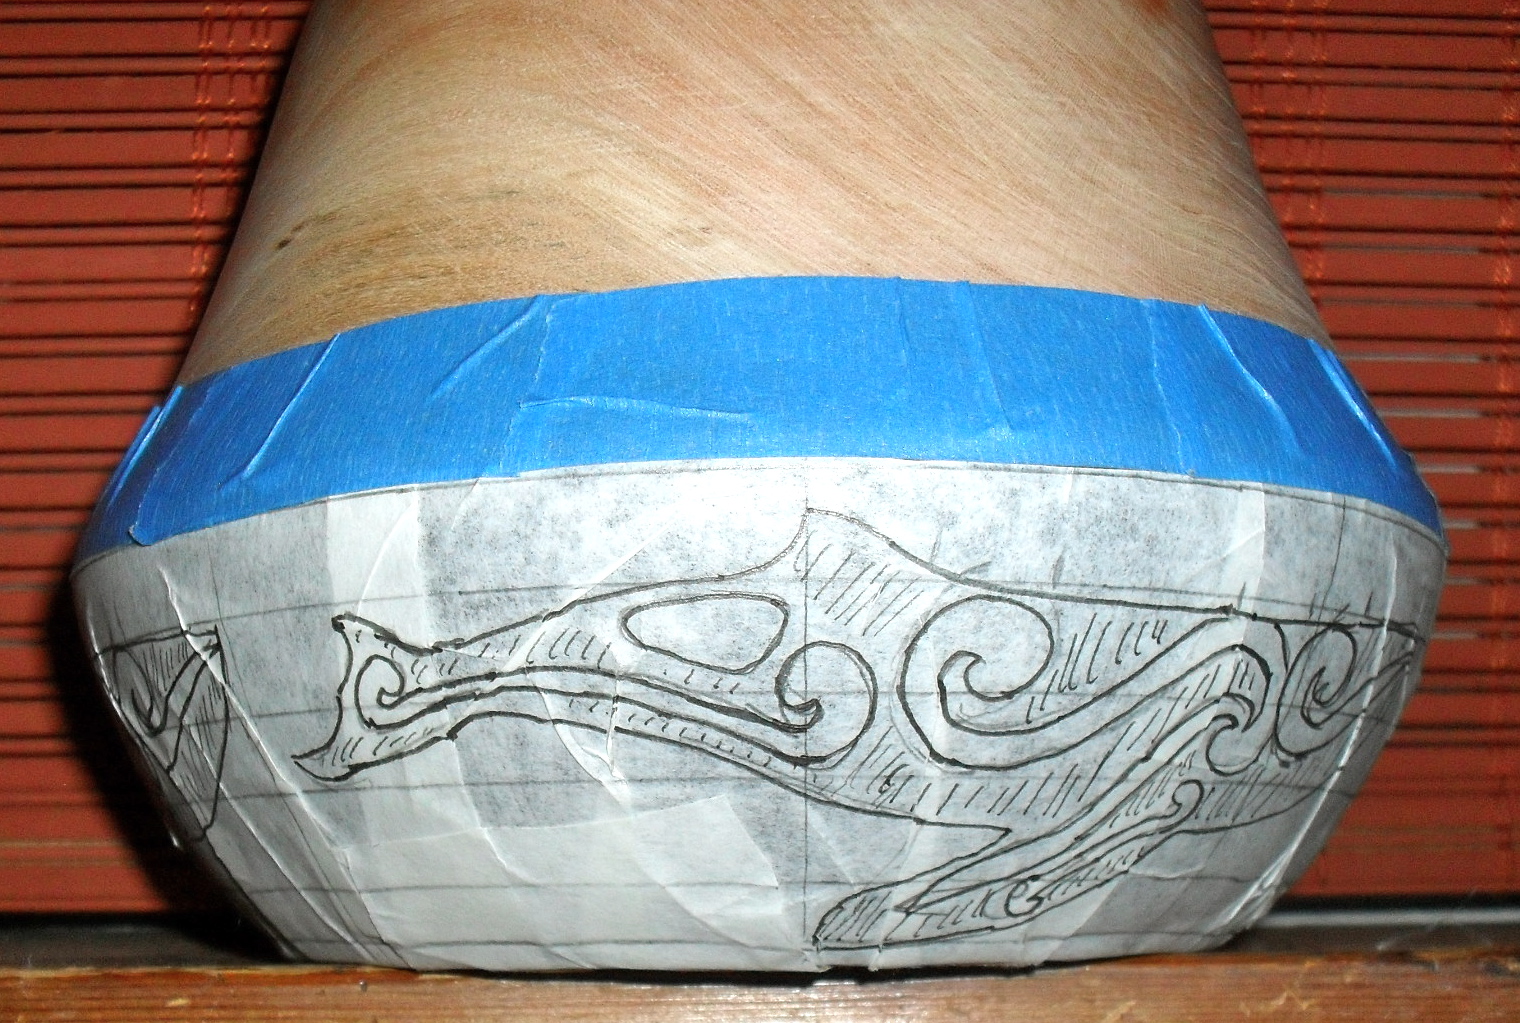
My next real project is in the works. I have a holly bowl that will be decorated in a very asian style with a nice little pedestal. More on that later.

Posted in In Yaakov's Workshop | Tagged , , , | 1 Comment

Genesis of an idea part 3

All the ideas I had finally came together and now the piece is finished, but let me tell you how it all came about.

The most challenging part for me was figuring out how to attach the shell strings to the bowl. Since June I have been walking (to lose weight), and running since August, and on the biggest hill, I focus on a topic that helps me take my mind off my burning tired legs. And the main point of focus for me was figuring out this problem. Here is what I finally figured out.

The first problem was getting even spacing around the bowl especially since it had ovaled a bit. I took a piece of blue painters tape and put it around the top of the bowl and marked a beginning and ending point. Then removed the tape and cut it off at the marks so I had a piece of tape that was the circumference of the bowl.

The next problem was figuring out how to make eleven evenly placed holes. Even with a ruler that would be a challenge, so I used an ancient tool to solve the problem easily. I used a pair of dividers; set a distance that looked right to the eye and stepped it off. After five adjustments, I got it! I marked the tape and had the eleven evenly spaced points.

Making the copper leaf ring with the tiny holes

So here is how I decided to attach the shell strings to the bowl. I ditched the idea about making a big necklace of shells because I really did not have enough jingle shells and I did not think they really needed to be connected horizontally. I drilled a tiny hole using a pen vice drill (.85mm), then I could slide a piece of wire through the hole and through the shell string loop, then loop that around the lip of the bowl. To disguise the copper loops that hold the shell strings up, I used copper leaf to make a copper ring around the top of the bowl. This idea worked perfectly.

The next problem (for me) was that I had already decided to call the piece “The Shell Pot”, but I did not think the hanging shells and outside decorations were enough to really connect the title. So running up that hill, I figured that out too! I knew I would not have enough jingle shells to go all away around the bowl, I decided to tie the theme of the bowl to making it literally a bowl for shells! I used pretty white scallop shells to make up for the lack of jingle shells for the shell strings, then filled the bottom of the bowl with nice sea shells that me and my children found during our beach vacation! Yes, perhaps I could have gone on-line and ordered more jingle shells, but then the project would not be as personal for me. For me, it would have been cheating somehow to buy shells.

Completed at last!

The shells in the bottom


For the finish, I applied a clear acrylic spary to the metal work on the bottm. For the rest of the outside and the inside of the bowl, I used shellac. On the inside of the bowl, I also applied a couple of coats of furniture wax to help prevent the shells from scratching the inside.

The piece is about 6″ high and about 6.5″ wide. Now I need to get some better photographs of it. My photography leaves a lot to be desired, so once I get a couple of good shots, I post them on the blog.

It’s interesting how ideas come and go, get used and get disgarded. The whole thing started with an idea for a shell necklace while walking on the beach, then developed further while in half a dream state, then finished out while in a runner’s mental zone. I guess you could say the whole idea started with walking and finished with running! And best of all, I have lost about 15 pounds in the process!

I hope you enjoyed this series. Tell me about how you get ideas.

Posted in In Yaakov's Workshop | Tagged , , , , , | 1 Comment

Genesis of an idea continued

Saturday mornings are generally the only time I get to stay in bed past 6:30am. Notice how I did not say sleep, the kids are usually up around 6:00 to 6:30am, so sleep is pretty much impossible once they are up. But on this particular Saturday (Shabbos) morning, I did not have to get out of the bed until 7:30am so I was wallowing in the bed and I started thinking about the shell bowl and the next thing I know, my muse tapped my head and the ideas started to flow.

Wavy lines start to blur your vision as we go back in time….I was relaxed with my head on the cool side of the pillow half asleep when that magic time started. Thinking….how do I tie the shells to the bowl? Idea grenade goes off! Shells – ocean, what’s in the ocean? Fish! Fish? Yes, David J Marks did fish in metal leaf. How do I make them stand out against the cherry? Color, color… black! What fish is black? Killer whale! Killer whale done in Eskimo style. How do shells tie to killer whale or Eskimo art? No. New Zealand Maori style. Yes! Shells work with that culture. Maori style whales and turtles! But how? On the lower part of the bowl paint it black, then use frisket to make black animals with white or silver leaf accents in a copper leaf ocean background. It ties! It is another piece for my Tiki series. Yes! Yes….. ye….sleep…..

That’s pretty much how it happened in a span of a couple of minutes.

The execution:

Making the design in metal leaf is pretty straight forward, but it just takes time. Here are the basic steps:

  1. Draw a line around the bowl to be the top edge of the water
  2. Paint the lower section black with acrylic paint
  3. Press the Frisket on the black part of the bowl
  4. Draw the whales and turtle
  5. Use an X-acto knife to remove everything around the animals and remove that frisket
  6. Apply sizing then cover with copper leaf for the ocean water.
  7. Cut out the designs within the animals with knife to remove the frisket
  8. Apply sizing and put silver leaf in those sections
  9. Peal off the last of the frisket – Viola!

Frisket applied and image drawn

You get a basic idea of the process


This is all done in small sections at a time and I have to allow for cure time. As of right now, I am still working on Step 8.  I hope to have this part done by Sunday, then I will use spray lacquer on this part of the bowl to protect the metal leaf. No chemical patinas for this project. I will just let the copper get a tad darker on its own.

For me, the next part is the hard part. And what is that? Well you are going to have to wait for that. I have an idea as to what I am going to do, but perhaps my muse will drop by pillow again and give me a better ideal during the Sukkot holiday when I get to stay in bed longer.

stay tuned……

Posted in In Yaakov's Workshop | Tagged , , , , , , | Leave a comment

Genesis of an idea

You never know when or how an idea might come to you. I now have an idea for a new turned piece that is a mix of different ideas, but how it all came together is the interesting part.

The Start:                                                                                                                                       You now see wavy lines as we go back in time to last August. It is the start of my beach vacation and I see a sea shell called a Jingle Shell (Anomia simplex). So named because a handful of these thin, translucent clamshell halves make a jingling sound when shaken together.

The shells are 1″–2″ in diameter and show a range of colors. Their surface is shiny like frosted nail polish. (Another name for the Jingle Shell is “Mermaid’s Toenails.”). As I was looking at the shell, I thought about collecting a bunch of them stringing them together in some way. I like to do little art projects on my beach vacation. So I spent about nine days looking for these shells and I managed to collect enough to do something with. But what? The wavy lines now take you back to the present.

The Now What Idea:

Now that I had all these shells, how would I connect them, and what would I do with them once I connected them? I thought and thought and got the idea to string them up like a pendant necklace and drape the necklace around a turned bowl.

The copper connectors

Once I had that idea, I started hooking them together. I used a small gauge copper wire to make loops that hooked together. I called one of my Maryland Artisan Guild clients who is a jewelry maker and asked her what type of adhesive I should use to connect the copper wire to the sea shell. She recommended the Amazing E6000, so I ordered a tube online and it worked great! So I started making vertical chains of shells. I didn’t want to attach them horizontally until I had a bowl to measure the layout against, so that would have to wait.

Now the bowl:

Not long after I got home from vacation I made a vessel with a Southwest Indian bowl shape. It had to be kinda big with a long neck, but my first attempt had a neck that was too short. Attempt number two blew up on the lathe. Attempt number three was once again too small, and finally attempt number four was the right shape and size.

An example of a chain

I really do try to turn almost everyday (except for Shabbos and holidays) and I can finally really tell that all that practice is paying off. It is good to see that my investment in education and tools is paying off.

Okay, now what:

When I held one of the vertical chains of shells against the bowl it looked pretty boring. So how am I going to make this thing look like something other than a plain bowl with a necklace of shells? Something has to tie the two objects together, and color coordinate them in some way. The plain cherry is not enough. Then, in one magic moment it all fell together…

stay tuned……..

Posted in In Yaakov's Workshop | Tagged , , , , , | 3 Comments

Money for nothin’ but my kicks are free

No money to buy lumber for a spec project and the chainsaw doesn’t work, what do you do? Make spoons and honey dippers!

Although I would rather be making furniture or working on bowl, sometimes you just have to make due and have fun with what you got! Now I have enough pieces for the next craft show on Sunday!

A fellow blogger asked me about using a honey dipper because he had never used one before. I do like the honey dipper better than a spoon because it fits better in the jar, you don’t get the massive amounts at one time, and you can clean it off quick with a bit of warm or hot water.

P.S. I got the part for my chainsaw yesterday afternoon and I did get it installed and she started up! Yeah!!!!!

Posted in In Yaakov's Workshop | Tagged , , , , | 3 Comments

Making Lemonade

Holly Honey dippers

The day started off pretty good, I got to sleep in (7:30am) and I had a nice 30 minute run, but the rest of the morning went downhill fast. After getting the laundry put away and getting another load started, I was hungry, but there was nothing for breakfast (at least for this person on a diet) and to add insult to injury, the wife took the kids to Dunkin Donuts for breakfast. (a treat since it was the last day of summer vacation for them). You don’t know how much I like donuts. I mean I REALLY like donuts. So I had a banana for breakfast, oy gevalt.

I get into the shop just and had a nice piece of cherry already mounted up on the lathe with all my tools sharpened ready to go. So as I plowed through the wood, I noticed a check in the wood. Yup, it ran all the way through. Oy gevalt.

Time to get the chainsaw and make more blanks. So I go to the outdoor building where I keep my chain saw and almost step into a HUGE spider web that blocked the whole door. I am still getting the shivers just thinking about it. My nose was just a breath away from it. Oy vey!

I get my chainsaw out of the building by running in and running out to avoid the big angry spider that made the web. Now my chainsaw starts acting up. A plastic part of the chainsaw has worn out and now I can’t make it start. And since today is labor day, I can’t order the part. Oy gevalt!

So what do you do on days like this? As the saying goes, when life throws you lemons, make lemonade.  I looked around the shop and saw a couple of small chunks of holly and thought about what I could do with them. It is almost Rosh HaShanna, so why not make honey dippers?! After all, Rosh HaShanna is the season of apples and honey, and better yet, I have a “Pre-Yom Tov Mall Event” next sunday at a synagogue so I guess HaShem wanted me to make honey dippers today.

We had a family friend drop by the house this morning, so I quickly made one for her, and made one for my family (since we did not have one) and a more fancy one for the show. I have plenty of cherry scraps around the shop so I guess I will make a handful of them for the show.

Thank you HaShem for directing me in the right way this morning, even with all the oy gevalts.

Posted in In Yaakov's Workshop | Tagged , , , , | 3 Comments

My spoons

As promised, here is a picture of the completed spoons. They are about 13 3/8″ long and the spoon part is about 2″ wide. After I finished carving them, I let them dry for a couple three days. Next, I sanded them silky smooth then gave them a couple of good coats of butcher block oil. Now they are ready for service.

I am selling them for $25.00 each, and after I cut into my last walnut log, I might make a couple more of them. If you are interested in buying one, or having one made for you, let me know. Hopefully, I will sell two of them so I can buy a better gouge to speed up production.

Enjoy!

Posted in In Yaakov's Workshop | Tagged , , | 1 Comment

Spoonin’

I have been thinking about making serving spoons for my big salad bowls for years, but my muse wasn’t interested enough to kick me in the butt to get me started. Well, the kick in pants finally came. With all the walnut chainsaw scraps just lying around, I really had no excuse to put it off any longer.

I know that there are a whole group of spoon makers out there, so I am sure I am going to send at least one of them into a conniption fit by my naiveté. I cut out a block of walnut about 5″x5″x12″ then used a bandsaw to make four pieces about 1.25″x5″x12″ (roughly).  Next, I drew the outline of a spoon that looked appealing to me and cut out that shape on the bandsaw. I also used a Sam Maloof bandsaw technique to do some very rough shaping of the bowl part of the spoon.

Shaping the bowl part

With the handle of the spoon firmly in the leg vise of my Roubo bench, I used my spoke shave to shape the bowl. I was surprised how easy that was to do.


The hollowing begins

Now for the hard part; hollowing out the bowl. I only have small carving tools, so my little number 7 gouge would have to do. I’d love to buy a couple of quality carving gouges, but I am flat broke, so the little tool will have to do. Thankfully, the little guy did pretty well. Granted, it took a little bit of time, but with a nice sharp edge it worked well.


Carving next to the wood pile

I don’t like walking in the heat in my good black and white clothes, but seating on my saw-bench carving way, with the sweat dripping down my arms, just puts me in the zone.  The heat, the intense concentration, the smells of my shop; the combination of these things make me happy. I believe that real craft and art comes out of these moments.


Here are some other things that can take me to my happy place. I haven’t had a musical interlude in a while, so here goes. (Sung to “My Favorite Things“)

Chocolate and doughnuts, spaghetti with meatballs                                                                Planes and good hand saws, my Roubo and oak mauls                                                           Big Robust wood lathes, my children that sing                                                                      these are a few of my favorite things

Cherry that smells nice and new projects started                                                                    square tenon shoulders and bowls cleanly parted                                                                    Halo with my wife, custards and creams                                                                                  these are a few of my favorite things

When the boss calls                                                                                                                      when the bills come                                                                                                                         when I’m feeling mad                                                                                                                          I simply remember my favorite things                                                                                         And then I don’t feel (quite) so sad

Did you picture me dancing outside of my shop in lederhosen? No? Thank goodness!

Now back to business. After the spoon part is shaped, rounding off the handle was pretty easy. I put the spoon part into the leg vise and use the spoke shave to make the square handle round. I did use a pocket knife to help shape the connection between the spoon part and the handle and that too was pretty easy with a good sharp blade.

Roughed out spoons

The walnut is pretty wet, so I am going to give the spoons I have made so far a couple three or four days to dry out a bit before I start sanding them. After they are fully sanded, I will coat them in food safe butcher block oil then they will be ready to use!


I would like to say that I don’t want the spoons to look perfect. I want them to look hand made. I’d hate for someone to think they were factory made. I’ll post photos of the final project then they are done.

till next time….

Posted in In Yaakov's Workshop | Tagged , | 4 Comments

Wanna see my jugs?

Although I haven’t been making any furniture or “art” pieces for the past month or so, I have been working hard on all that walnut I got. (see the Muchachos story) So far I have made some very large bowls that are still drying, a number of other thin bowls that are waiting for finish, and a couple of large hollow forms.

I made the hollow forms two different ways. The first one, I made with the pith going up and down. I was hollowing end grain so it took a long time to hollow. Now that the vessel has dried, it has taken on a tear shape as the pith expands. The second vessel was hollowed with the pith parallel to the ground. It was much easier to hollow, and now that  it has dried, the pith has expanded out to the sides. When placed side by side, you can really see how the pith orientation affects the shape of the vessel.

I used a gloss poly for the finish, then I used india ink to black out the inside. They are pretty thin, but not Ellsworth thin, and I still make the bottoms a tad heavy. Making it super thin, 3/16″ or less, is like playing chicken. Needless to say, I’m still the chicken. Anyway, wanna see my jugs?

Do they look natural?


Posted in In Yaakov's Workshop | Tagged , , , , , | 6 Comments

A little spark from DJ Marks

If you have been a regular to my blog, you know that my woodworking hero is David Marks. I was fortunate enough to be recruited to help him with his latest DVD, “Double Bevel Marquetry.” I was asked to help with the editing by Blair Glenn who did the video work. He would send me his edited footage for me to review, and I would offer advice about lighting, what was being said, and suggestions on music etc…. I was very happy to do this, and yesterday I received a copy of the DVD in the mail from David along with a nice little note that made my day.

You can click on the image to see the letter.

Click on the image to see the DVD


If you are interested in learning how to do marquetry, I highly recommend the DVD. David’s work is top-notch and he does a great job explaining the technique.

I really needed this to brighten my day. I am very proud to have been part of the project, and especially to do anything with my hero. What a treat!

I want to apologize for not writing, but my furniture business is flat broke. I don’t have any money to buy lumber for the spec projects I want to do, and I have been hardly selling anything. My last couple of shows did not even cover the cost of the event and all my potential commissions fell through. When will this global economic recession ever end! 2012 has really been a crappy year.

On a different note:

I was watching a couple of “Craft in America” episodes yesterday day and it made me think about something; (BTW, these are well worth watching) does my craft necessarily have to represent something I have to say, to be considered art? Granted, my utility bowls I don’t consider “art per se”, but I do consider my “Tiki” series and “Lost in the Woods” series art. They don’t necessarily reflect my feelings or something I am passionate about, so does that make it any less worthy to be called “art?” What are your thoughts about this?

yaakov…..

Posted in In Yaakov's Workshop, On the topic of Art | Tagged , , , , , | 3 Comments