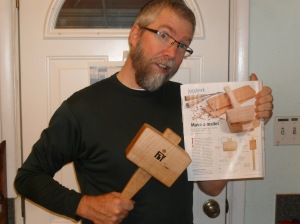
Well, I am still commission-less, and I am still broke, so I can only work with the scraps I left on the lumber rack. As you well know, you must practice to keep your skills sharp, so a bit of practice I had.
I received a copy of the “Fine Woodworking, Tools & Shops” annual magazine issue, and whilst flipping through the pages, something caught my eye. There was an article entitled: “Make a mallet, build a great one while honing your hand tool skills” by Michael Cullen. This looked like a great little project to keep my skills sharp.
Now I already have an antique jointer’s mallet that I really like, but one day, my son might want his own mallet, so why not make another one?! To me, mallets are like tongs, which begs the question, if you need tongs to make tongs, who made the first set of tongs? The same with this project, to create the through mortise in the mallet’s head, I really needed a mallet. So who made the first mallet? Thank goodness I already had one!
It just so happened that I had some pieces of hard maple that were the perfect thickness to make the head, and I had to use red oak for the handle. I’m not going to bore you with how I made the mallet because you could look it up for yourself on-line, besides there was nothing special about making this. That being said, you did have to have a wide variety of hand tools to make the project (by hand): Rip saw, cross cut saw, tenon saw, a small cross cut back saw, brace and bit(s), mortising chisel, a variety of firmer chisels, jack plane, smoothing plane, block plane, and a spoke shave.
The design of the mallet handle will prevent the mallet head from “flying off the handle” and once I had the handle set in place it was in there like a rock, but I was still afraid it might “move a bit” and slide down because of my non climate controlled workshop. So I drilled a hole all the way through the head and handle and made an oak pin to hold the two parts together for sure. Better to be safe than sorry later.
Before I did the final sanding, I branded my logo onto both sides of the mallet head to mark the tool as mine and give it a little touch of flair. After it was sanded to 320 grit, I applied a coat of Danish oil, then shellacked it.
It is a little bit heavier than my other mallet so the handle shape was important, thus I used the spoke shave to make the handle fit my hand nicely. Boy, I did enjoy using a spoke shave! I don’t know what it is about that tool, but it is fun to use.
Just like making the dressers and chests you use to hold your own clothes, making your own tools give you a sense of accomplishment and pride. I like eating off the table I made, and sleeping in the bed that I made, and I can’t wait to use my new mallet, that “I made!”
Do you feel that sense of pride too?
Till next time,
yaakov…..


The mallet looks great. I also have the FW tools and shops issue and I’ve thought about making the mallet. I don’t have any suitable scrap to make it at the moment. I have a nice beech one that I purchased a few years ago. I like it but I can’t get the head to seat in the handle sometimes. I came close to gluing it. Any suggestons?
If the head is just loose, I would drive a pin through the head and mallet handle. Thanks for reading my blog! yaakov….